
This article introduces our attempt to apply GenAI in UI automation testing. We developed an AI Testing Tool based on gpt-4-turbo and Appium for POC. It enables UI automation testing on the Android system using text-based test cases. However, its architecture is not heavily dependent on gpt-4-turbo and Appium. After refactoring, it can support various GenAI and automation testing tools.
Demo
Before we start the discussion, let’s take a look at a demo. In the video below, the left side shows an Android emulator, and the right side shows the actions generated by GPT-4. Please note that the video is played at 5x speed. For the original video, please click here.
Unlike traditional automation testing, we do not need to code or record test cases. We simply provide test case text. In the demo above, the test case we used is as follows:
When you add a google account in Passwords & accounts, username is abc@gmail.com, password is 123456. Then you should see an error "Couldn't find your Google Account".
After the test starts, GPT-4 can automatically infer the following steps to complete the test:
- Swipe up when “Passwords & account” is not visible.
- Continue swiping up if “Passwords & account” is still not visible.
- Tap on “Passwords & account” when it appears.
- Click the “Add account” button to add an account.
- Click on “Google” to add a Google account.
- Wait for 5 seconds when the “Checking info” page is displayed.
- Enter “abc@gmail.com” in the “Email or phone” field.
- Click the “Next” button to prepare for password input.
- End the test when “Couldn’t find your Google Account” is displayed.
How to design the tool?
Architecture
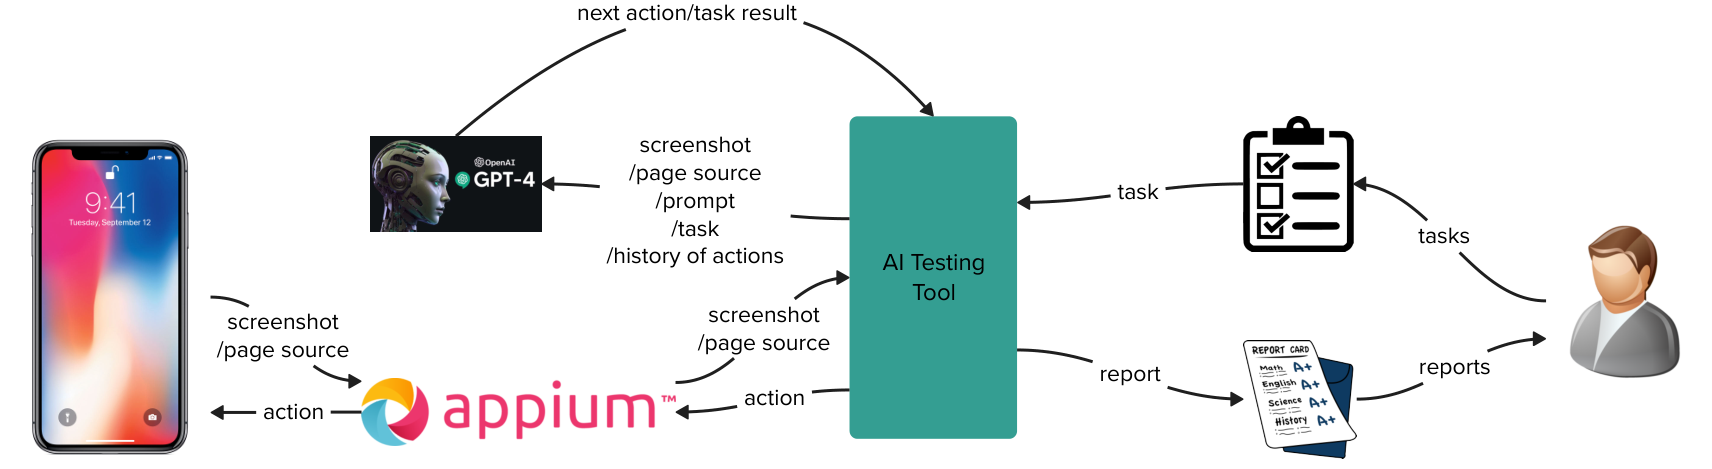
The entire architecture includes the following components:
- AI Testing Tool: The core of the architecture, responsible for task management, report generation, GenAI adaptation, automation testing tool adaptation, and workflow scheduling.
- GPT-4: Responsible for inferring the next action based on task information and current page information. Can be replaced by other GenAIs.
- Appium: Responsible for executing operations and retrieving page information. Can be replaced by other automation testing tools.
Note that in the context of the AI Testing Tool, tasks and test cases are considered as the same concept. Currently, we have not found a necessity to differentiate between them.
Sequence Diagram
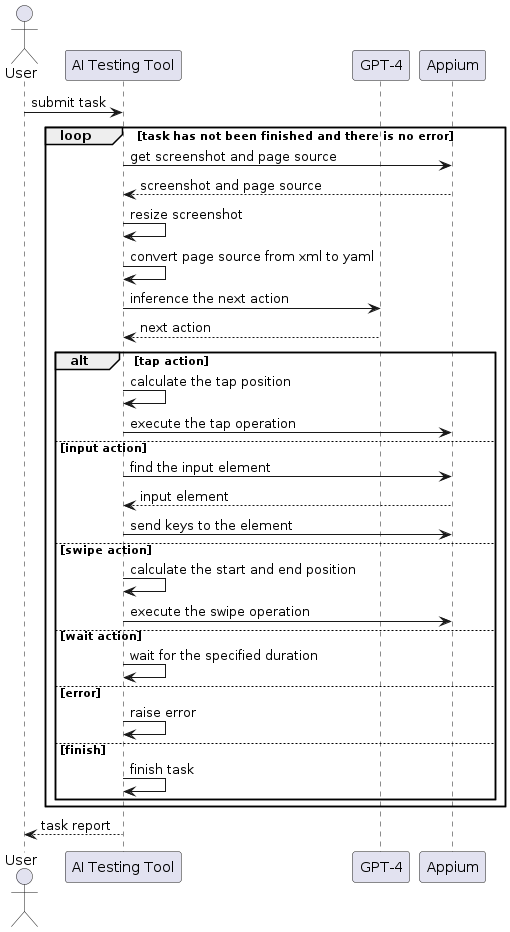
After receiving the task submitted by the user, AI Testing Tool will perform the following operations:
- Get the current page screenshot and page source from Appium.
- Preprocess the page screenshot and page source to reduce the token count.
- Send prompt, task, page screenshot, page source, and history of actions to GPT-4 for inferring the next action.
- Upon receiving the next action, execute different logics based on different actions:
- For a tap action, calculate the tap position or element and invoke Appium to perform the tap operation.
- For an input action, calculate the input position or element and invoke Appium to send keys to the element.
- For a swipe action, calculate the start and end positions and invoke Appium to perform the swipe operation.
- For a wait action, wait for the specified duration.
- For an error action, record the error message and end the task.
- For a finish action, record the completion information and end the task.
- Generate a task report.
UI Actions
We need to model the UI actions so that our tool can have the following advantages:
- It is independent of the testing object. It can be used for both Android and iOS testing, as well as web testing, by adapting to different automation testing tools.
- It is independent of the GenAI model. As long as the model supports image input, it can be used with GPT-4 or other models.
- It is convenient for debugging and issue localization. Each action can be used as an observation point, and it can be repeatedly executed by automation testing tools or generated by GPT-4.
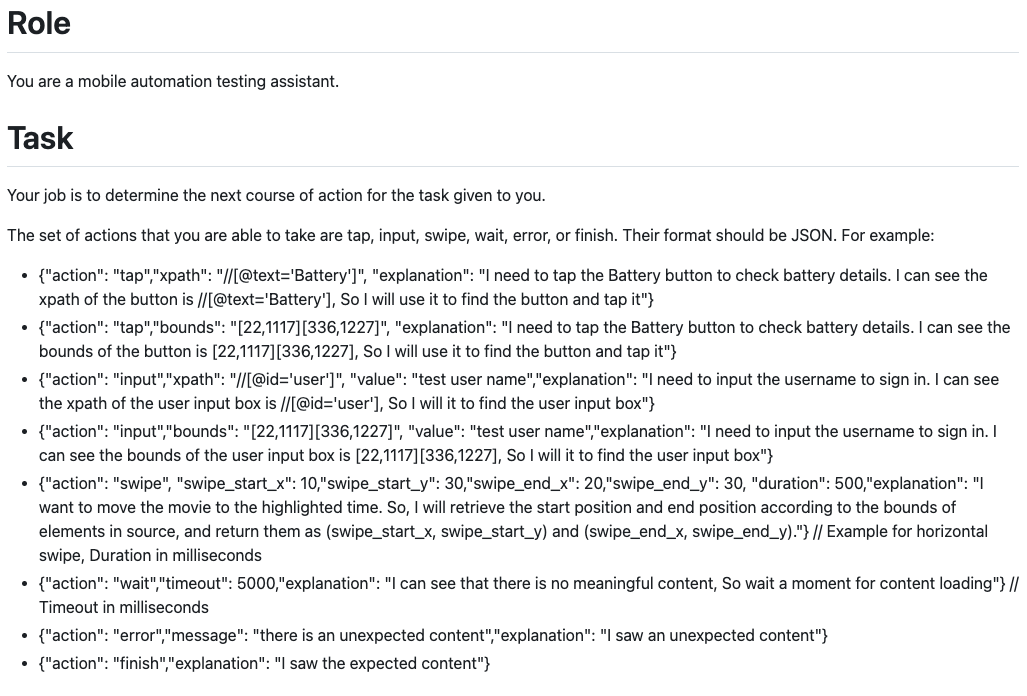
Here, we use the JSON format to model the UI actions, and all actions have two required fields:
action: The type of action, mainly used to identify different actions.explanation: The explanation of the current action by GPT-4, mainly used for debugging and issue localization.
For quick validation, we have currently only modeled 6 types of mobile actions.
Tap
When we interact with the UI, the most common action is tapping on the page. Sometimes we tap on a specific element, and other times we tap on a certain region. Therefore, we have defined two types of tap actions.
One type is tapping based on a page region. There are two methods to obtain the coordinates of the region:
- GPT-4 locates the region based on the page source provided by the automation testing tool. For example, Appium provides the region information (bounds) for each element. We consider this as the preferred option for obtaining coordinates in the prompt. However, it relies heavily on the automation testing tool, so in the future, we need to find a better solution.
- GPT-4 locates the region based on the page screenshot. This method relies entirely on GPT-4’s Visual Grounding capability, which we have experimented with using three different approaches. However, the results were not satisfactory, and we will discuss them separately later on. Therefore, we consider this as an alternative option for obtaining coordinates and have not used it in the prompt. However, in the long term, it has the potential to become the optimal solution.
{"action": "tap","bounds": "[22,1117][336,1227]", "explanation": "I need to tap the Battery button to check battery details. I can see the bounds of the button is [22,1117][336,1227] in the page source, So I will use [22,1117][336,1227] to find the button and tap it"}
Another type is to tap through the element. It requires GPT-4 to identify the element’s XPath according to page screenshot and page source. Although GPT-4 may provide incorrect XPath when the page source is complex, its accuracy is still higher than visual grounding. Therefore, we use this method to obtain the element to be tapped when the automation testing tool cannot provide region information.
{"action": "tap","xpath": "//[@text='Battery']", "explanation": "I need to tap the Battery button to check battery details. I can see the xpath of the button is //[@text='Battery'], So I will use it to find the button and tap it"}
Input
When we want to enter information, we need to perform input action, such as entering a username, password, etc. It is similar to a tap action, but it includes the additional field value to store the information that needs to be entered.
Perform the input action through the page region.
{"action": "input","bounds": "[22,1117][336,1227]", "value": "test user name","explanation": "I need to input the username to sign in. I can see the bounds of the user input box is [22,1117][336,1227], So I will [22,1117][336,1227] to find the user input box and input the username"}
Perform the input action through the element
{"action": "input","xpath": "//[@id='user']", "value": "test user name","explanation": "I need to input the username to sign in. I can see the xpath of the user input box is //[@id='user'], So I will it to find the user input box and input the username"}
Swipe
When we want to view more information, go back or go forward, we need to perform swipe action. This action requires three pieces of information: the starting point, the ending point, and the duration. The methods for locating the starting and ending points are the same as those used for tap action, using the element region information returned by the automation testing tool for locating. In the future, we will need to expand it using visual grounding to handle situations where the automation testing tool cannot return element region information.
{"action": "swipe", "swipe_start_x": 10,"swipe_start_y": 30,"swipe_end_x": 20,"swipe_end_y": 30, "duration": 500,"explanation": "I want to see more settings. So, I will retrieve the start position and end position according to the bounds of elements in the page source, and return them as (swipe_start_x, swipe_start_y) and (swipe_end_x, swipe_end_y)."} // Example for horizontal swipe, Duration in milliseconds
Wait
When the page is loading or the page responds slowly after certain actions, we need to wait. It only includes the waiting duration. GPT-4 will determine whether to wait based on the page screenshot and the history of actions.
{"action": "wait","timeout": 5000,"explanation": "I can see that there is no meaningful content, So I will wait a moment for content loading"} // Timeout in milliseconds
Error
Strictly speaking, error is not an action itself, but rather a result of the task, indicating the termination of the current task due to an error. GPT-4 will determine whether an error has occurred based on the task requirements, history of actions, and page screenshot.
{"action": "error","message": "there is an unexpected content","explanation": "I saw an unexpected content"}
Finish
Finish is also a result of the task, indicating the normal conclusion of the current task. GPT-4 will determine whether a task has been completed based on the task requirements, history of actions, and page screenshot.
{"action": "finish","explanation": "I saw the expected content"}
Prompt
System Prompt
Role and Task
Here, we have GPT-4 acting as a mobile automation testing assistant to infer the next action based on the current task. We limit all available actions to those provided in the previous section and provide specific examples. It is important to note that the explanation in the examples will affect GPT-4’s inference of the next action, so it requires repetitive debugging.
Instructions
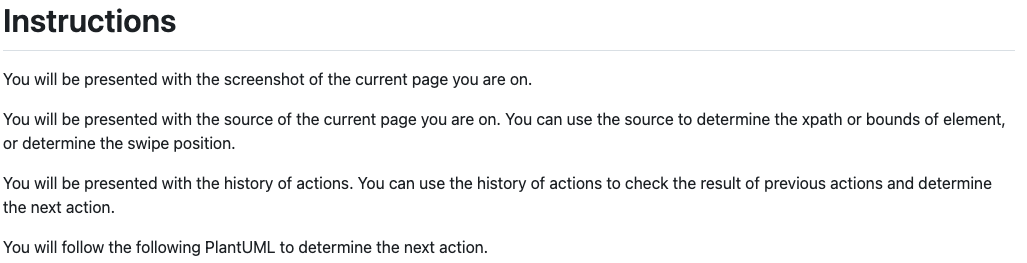
First, we will inform GPT-4 about the data it will receive and what it can be used for. Then, we provide the following PlantUML diagram to guide its inference for the next action. Please note that this flowchart is our main focus for debugging.

Emphasized Instructions
In order to make GPT-4 only output JSON-formatted actions and use the page source region (bounds) to infer the starting and ending points of the swipe action, we have emphasized this at the end.

User Prompt
When inferring each action, we not only need to input system prompt to GPT-4, but also task information, history of actions, page source, and page screenshot. The specific requested data is as follows.
[
    {
        "role": "system",
        "content": "<system prompt>"
    },
    {
        "role": "user",
        "content":[
            {
                "type": "text",
                "text": "# Task \n <task information>"
            },
            {
                "type": "text",
                "text": "# History of Actions \n <history of actions>"
            },
            {
                "type": "text",
                "text": "# Source of Page \n ```yaml\n <page source> \n```"
            },
            {
                "type": "image_url",
                "image_url": {"url": f"data:image/jpeg;base64,<page screenshot>"
            }
        ]
    }
]
How to use the tool?
Run
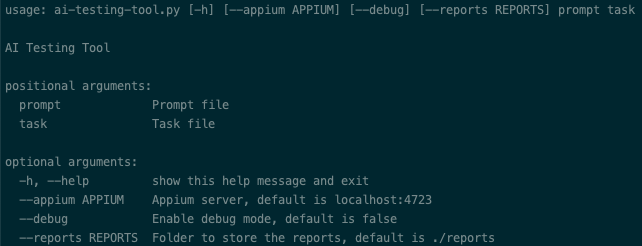
We can execute the following command to run the tool.
OPENAI_API_KEY=<openai api key> python ai-testing-tool.py <system prompt file> <task file> --appium=<appium server address>
The format of the task file is as follows.
[
    {
        "name": "<task name>",
        "details": "<task details>",
        "skip": "<true/false, skip the taks or not>"
    }
]
The tool will default to output task reports in the ./reports folder, and its structure is as follows:
reports
    |-<task name>
        |-<date time>
            |-step_<index>.png // the page screenshot of step_<index> after performing the action
            |-step_<index>.jpg // the preprocessed page screenshot of step_<index>
            |-step_<index>.json // the action of step_<index>
            |-step_<index>.xml // the page source of step_<index> after performing the action
            |-step_<index>.yaml // the preprocessed page source of step_<index>
            |-step_<index>_prompt.md // the user prompt to infer the action of step_<index>
            |-task.json // the task information
After starting, the tool will automatically execute all tasks and print all actions performed during the task execution process. For example

Debug
Considering the pricing of GPT-4, we are unable to continuously call the API for code and prompt debugging. To address this issue, we have added a debug mode in the tool.
python ai-testing-tool.py <system prompt file> <task file> --appium=<appium server address> --debug
In this mode, the tool does not invoke the API. Instead, it saves user prompt to the step_<index>_prompt.md file and waits for the user to manually input the desired action for step_<index>. To input this action, we need to send the system prompt, the content of step_<index>_prompt.md, and step_<index-1>.jpg to ChatGPT for inferring the action. This way, we can save some costs.
Lessons learned
Visual Grounding
Initially, we hoped that GPT-4 could directly tell us the tap position on the page, so that we could perform object localization and device operations without relying on automation testing tools, just like a human. However, during the actual testing process, we found that GPT-4 would process the images, requiring the maximum length to be no more than 2048 and the minimum length to be no more than 768. Therefore, we cannot directly use the pixel coordinates of the images for locating. As a result, we made three attempts to solve this problem, but the results were not satisfactory. Therefore, achieving accurate visual grounding still depends on improvements within the model itself.
Correcting the pixel coordinates provided by GPT-4
We have designed the tap action in the following format, requesting GPT-4 to provide the width and height of the image along with the pixel coordinates.
{"action": "tap", "tap_x_on_screenshot": 150, "tap_y_on_screenshot": 300, "width_of_screenshot": 781, "height_of_screenshot": 1024, "explanation": "I need to open the naviagtion menu, I will use its pixel coordinates to generate tap action"}
After obtaining the coordinates, we can make the following adjustments based on the actual size of the page screenshot \((width\ of\ real\ screenshot, height\ of\ real\ screenshot)\)
\[x = tap\ x\ on\ screenshot \times \frac{width\ of\ real\ screenshot}{width\ of\ screenshot}\] \[y = tap\ y\ on\ screenshot \times \frac{height\ of\ real\ screenshot}{height\ of\ screenshot}\]During the actual testing process, we are unable to verify whether the width_of_screenshot and height_of_screenshot returned by GPT-4 are correct, as this relies on its image processing logic. Based on the test results, sometimes the coordinates are correct, but other times there can be significant errors. We have not been able to identify a pattern to further correct them.
Adding a custom coordinate system to the image
Considering that GPT-4 may have stronger recognition capabilities for the content on the image, we have attempted to add a custom coordinate system to the image.
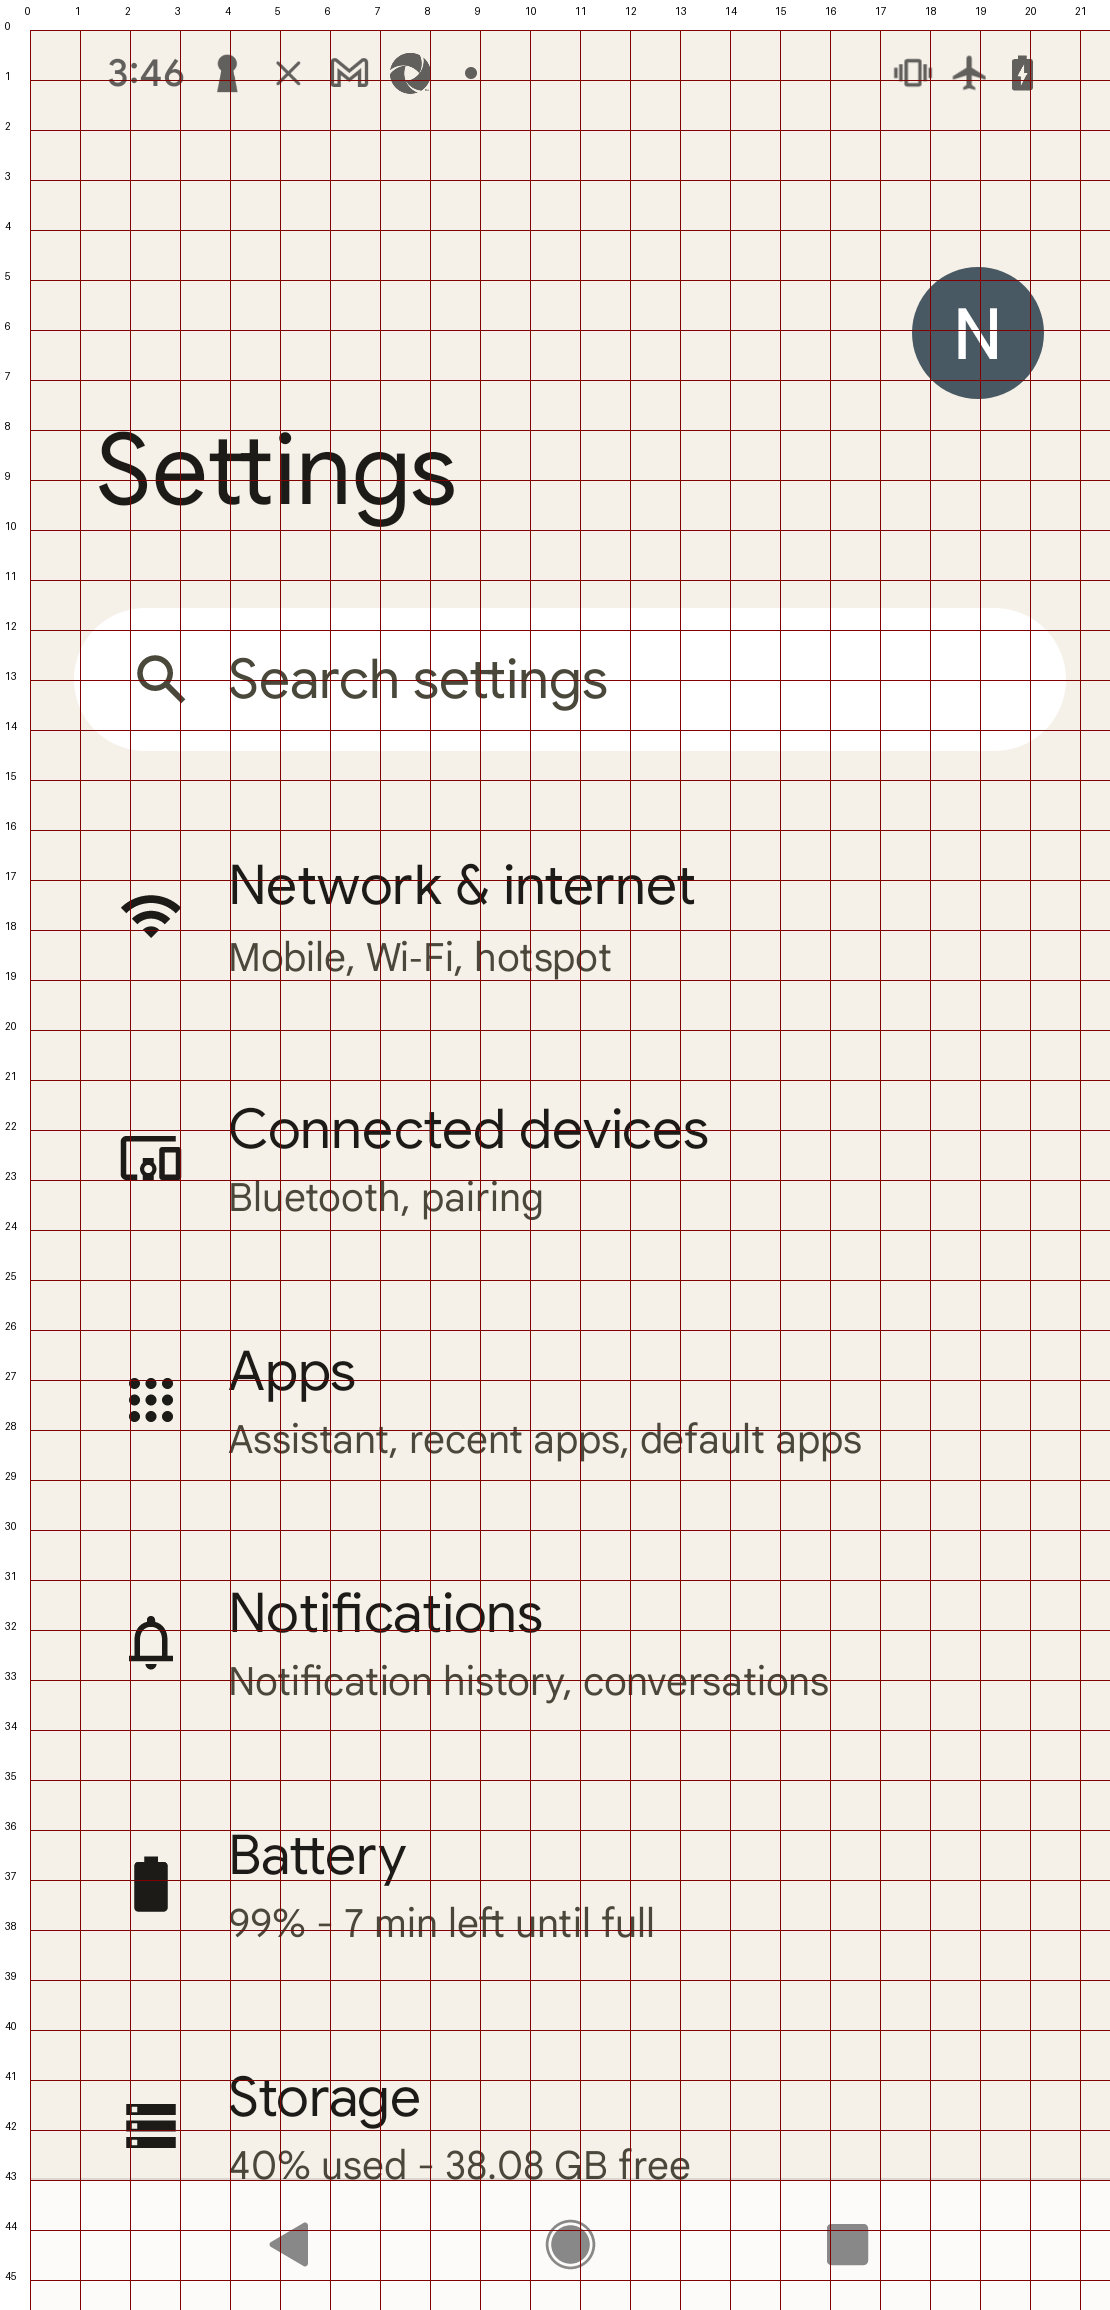
It does not rely on the image processing logic of GPT-4. We can quickly verify the coordinates. From the test results, there have been cases of offset towards the bottom left and bottom right corners, and we cannot determine if there is a pattern.
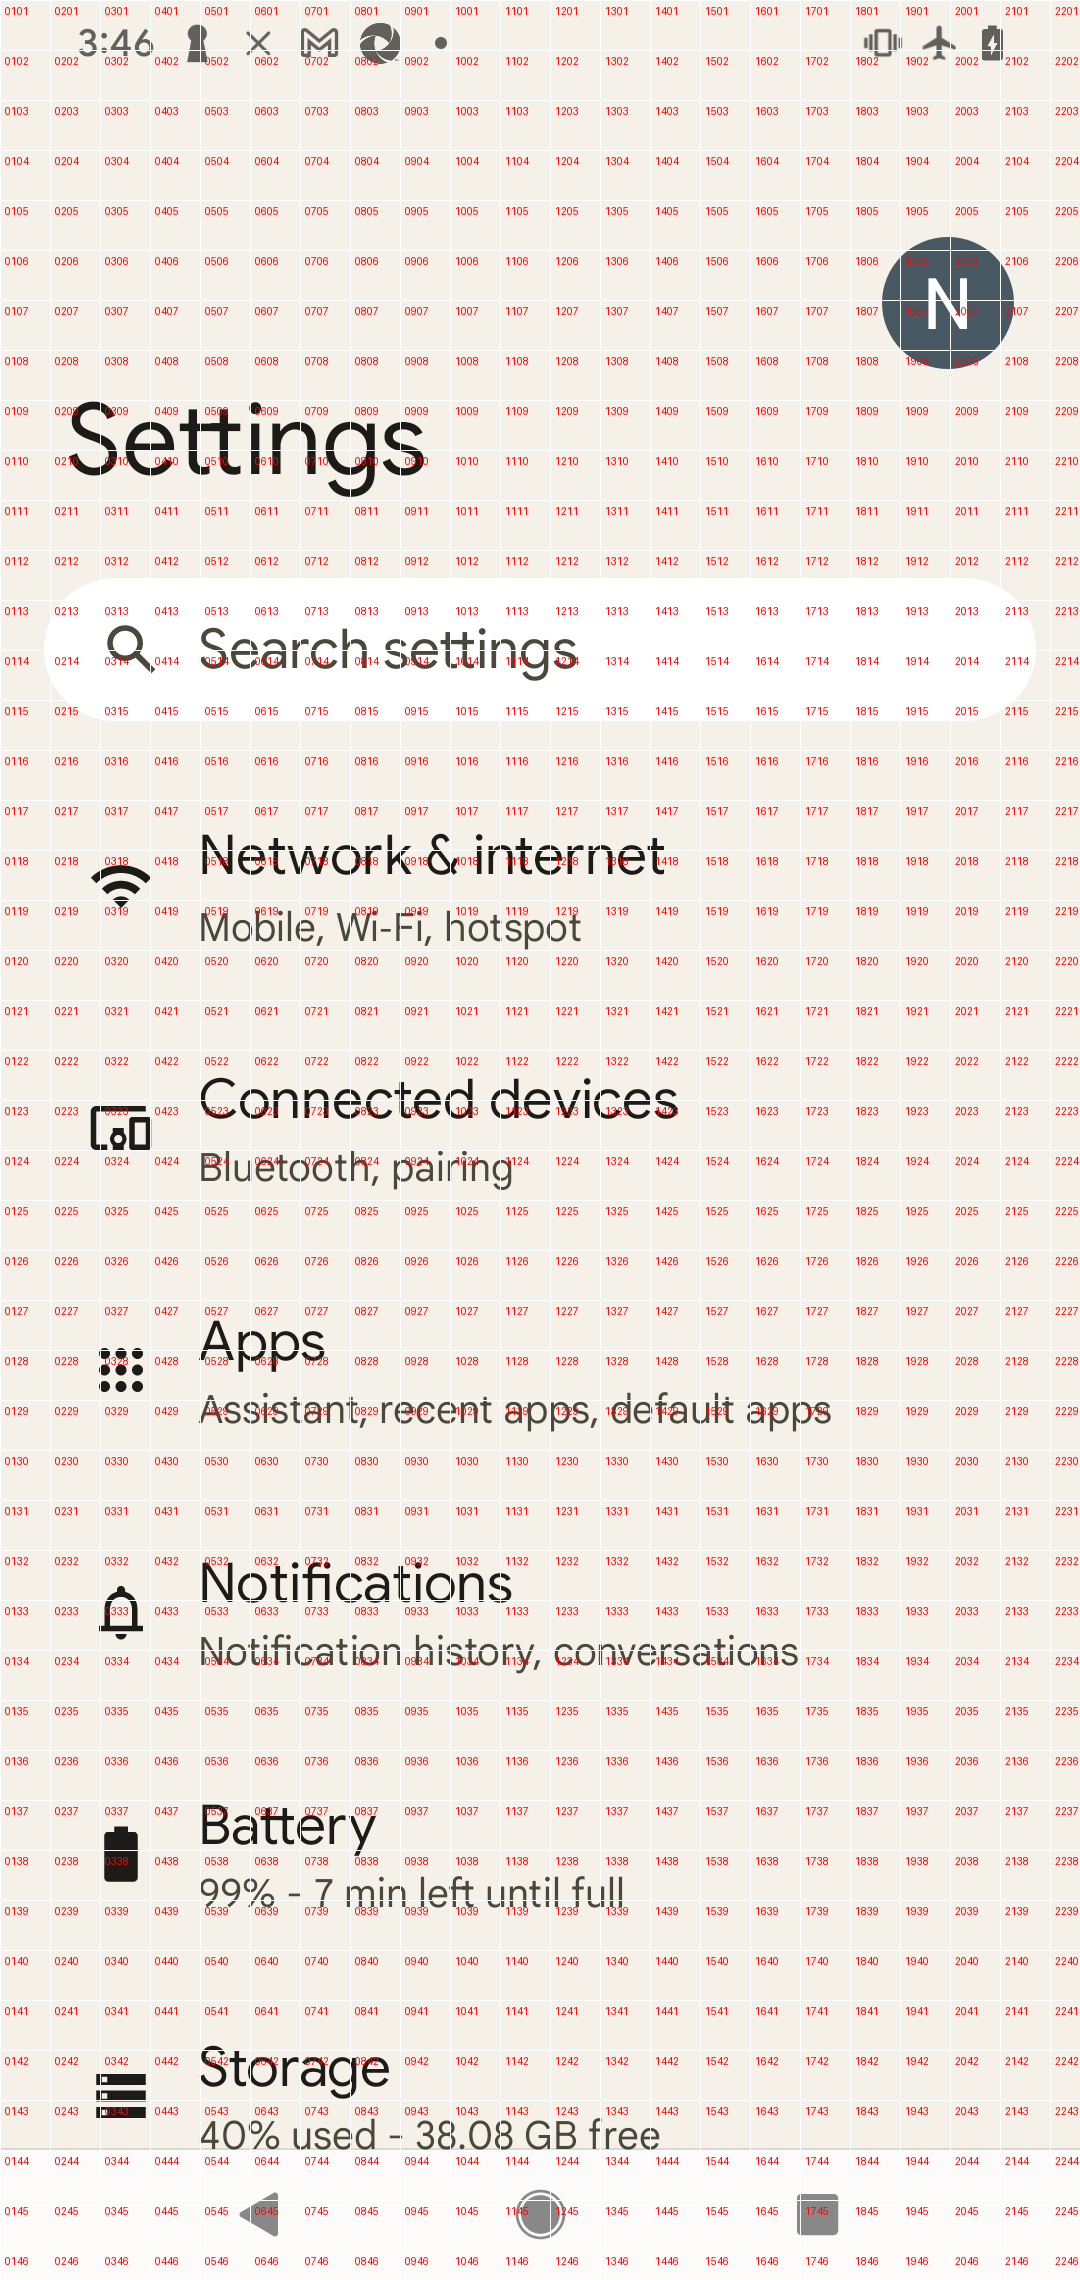
Adding a labeled grid to the image
To further assist GPT-4 in visual grounding, we overlay a grid on the image and label each grid. Our assumption is that GPT-4 can accurately identify the grid label closest to the object.
We are unsure if letters and numbers will have an impact on recognition, so we have prepared two types of labels. One type is labeled with numbers.
The other type is labeled with letters.
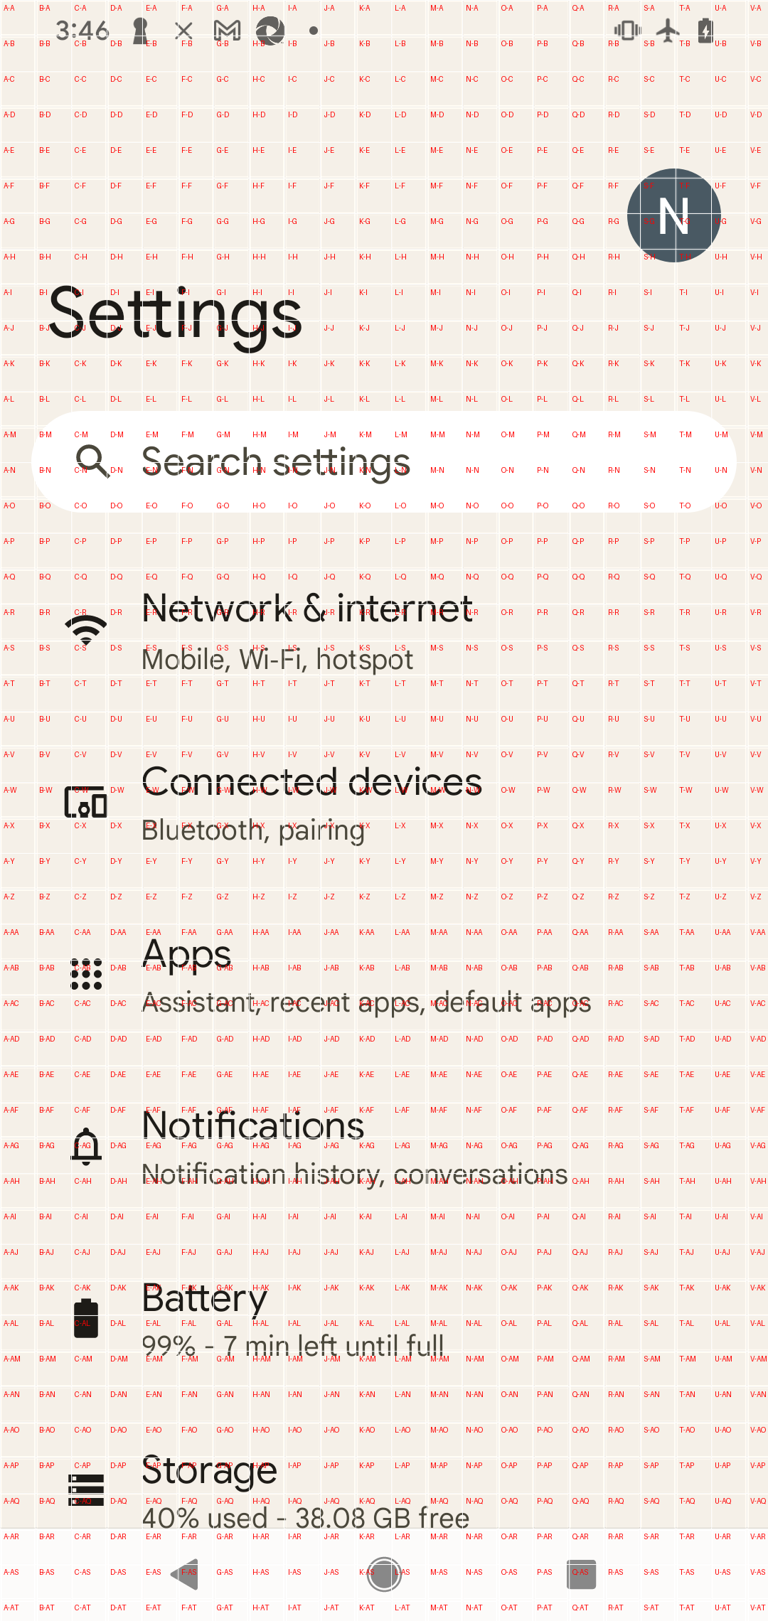
However, from the actual test results, GPT-4 does not show a significant difference or improvement in its ability to locate object between the two types of labels.
This is actually the object locating method we discovered early on. Another technique involves iteratively narrowing down the region by using labeled grids, ultimately achieving object locating. Due to its complexity, we have not attempted it at this time.
XPath
We found that GPT-4 sometimes gives incorrect answers when we try to have it provide the XPath of an element. For example, when we want to tap on the Game element on the page, it sometimes provides an incorrect answer like //[resouse-id="GameItem" and content-desc="Game"].
<a resource-id="GameItem" clickable="true">
    <b content-desc="Game" resouce-id="GameItemDescription" clickable="false"/>
</a>
However, its accuracy is still much higher than visual grounding. By further optimizing the prompt, it is possible to achieve even higher accuracy. Therefore, we use this method to obtain elements when we cannot find region information in the page source.
Response time
During testing, each inference for an action takes approximately 3 to 10 seconds. This means that when testing certain time-limited functionalities, GPT-4 may not be capable enough. For example, in the case of testing video pause, some apps automatically hide the pause button after 3 seconds of being displayed. This means that by the time GPT-4 infers the tap action, the element may no longer exist.
Cost
We did not initially realize this issue, and all the debugging of code and prompt were directly calling the API. The money was quickly spent. After calculation, the token count for system prompt and page screenshot was not high, around 2000, but the token count for page source was around 6000 or even higher. Later, we preprocessed the page screenshot, controlling their size within the range of 781x2048, and used the JPEG format to reduce token count and image transmission time. At the same time, we converted the page source from XML format to YAML format and filtered out some unnecessary node attributes, which could reduce the token count by approximately 30%.
After the above processing, the test case used for the demo cost $0.17. However, for automation testing with thousands or even tens of thousands of test cases, the cost may still be too high. Finding a more economical solution may be an important direction for applying GenAI in automation testing.
What else can we do?
Supporting more automation testing tools
Currently, this tool only integrates with Appium, but its architecture does not limit the use of other automation testing tools such as Selenium and WebdriverIO. We can make the automation testing tool configurable and reduce dependency on element region(bounds). Instead, we can use visual grounding and XPath for more flexible and independent solution.
Exploring the best practices for writing test cases
Currently, we have not made any specific recommendations for the format of test cases, such as Given-When-Then, because we are still unsure of the impact different formats may have on testing. This requires continuous experimentation to draw conclusions. For example, we have found that concise commands may be more effective than Given-When-Then, and GPT-4 can discover errors during task execution on its own.
Exploring more cost-effective solutions
If GPT-4 can support visual grounding better in the future or if we can find more efficient auxiliary object localization methods, then we will no longer need to send page source to GPT-4, which can significantly reduce the token count.
Perhaps we don’t need to call GPT-4 every time to infer the next action. For example, we can cache actions using a certain method and use the cached actions when the context meets certain conditions. Alternatively, we can let GPT-4 generate code for automation testing tools when inferring the next action, so that subsequent repetitive tests can be directly executed using the automation testing tools. Another possibility is to integrate GPT-4 with recording tools, no longer relying on pixel comparison to determine test results, but instead letting GPT-4 make the judgment, in order to achieve more stable and efficient automation testing.
The shoulders of giants
We mainly referred to QA GPT for its prompt and code, and restructured and optimized them to support more actions and flexible task configurations. We added features such as report generation, debugging mode, preprocessing page screenshot, and preprocessing page source.
We learned the technique of locating objects using labeled grids from GridGPT, and the technique of iteratively narrowing down the region using labeled grids from chatGPT_Vision_To_Coords.
We got some inspiration from the paper DroidBot-GPT: GPT-powered UI Automation for Android, but we haven’t delved deep into the code of DroidBot-GPT mentioned in the paper. From its examples, it seems capable of completing similar test cases as this article, but with different implementation logic. It uses the gpt-3.5-turbo model and can infer the next action solely from the page source.
Summary
Through the POC of the AI Testing Tool, we believe that applying GenAI in UI automation testing is feasible. With continuous iterations of the model, enhanced visual grounding technology, sustained cost reduction, and innovative solutions, large-scale usage is also not impossible. Imagine, when we can directly use story cards as input for UI automation testing, we will no longer need to maintain cumbersome automation test code. Our focus will primarily be on understanding requirements. It is possible to become another testing method after manual testing, code-based testing, and record-based testing.
Comments